Serial console on Huawei B593u
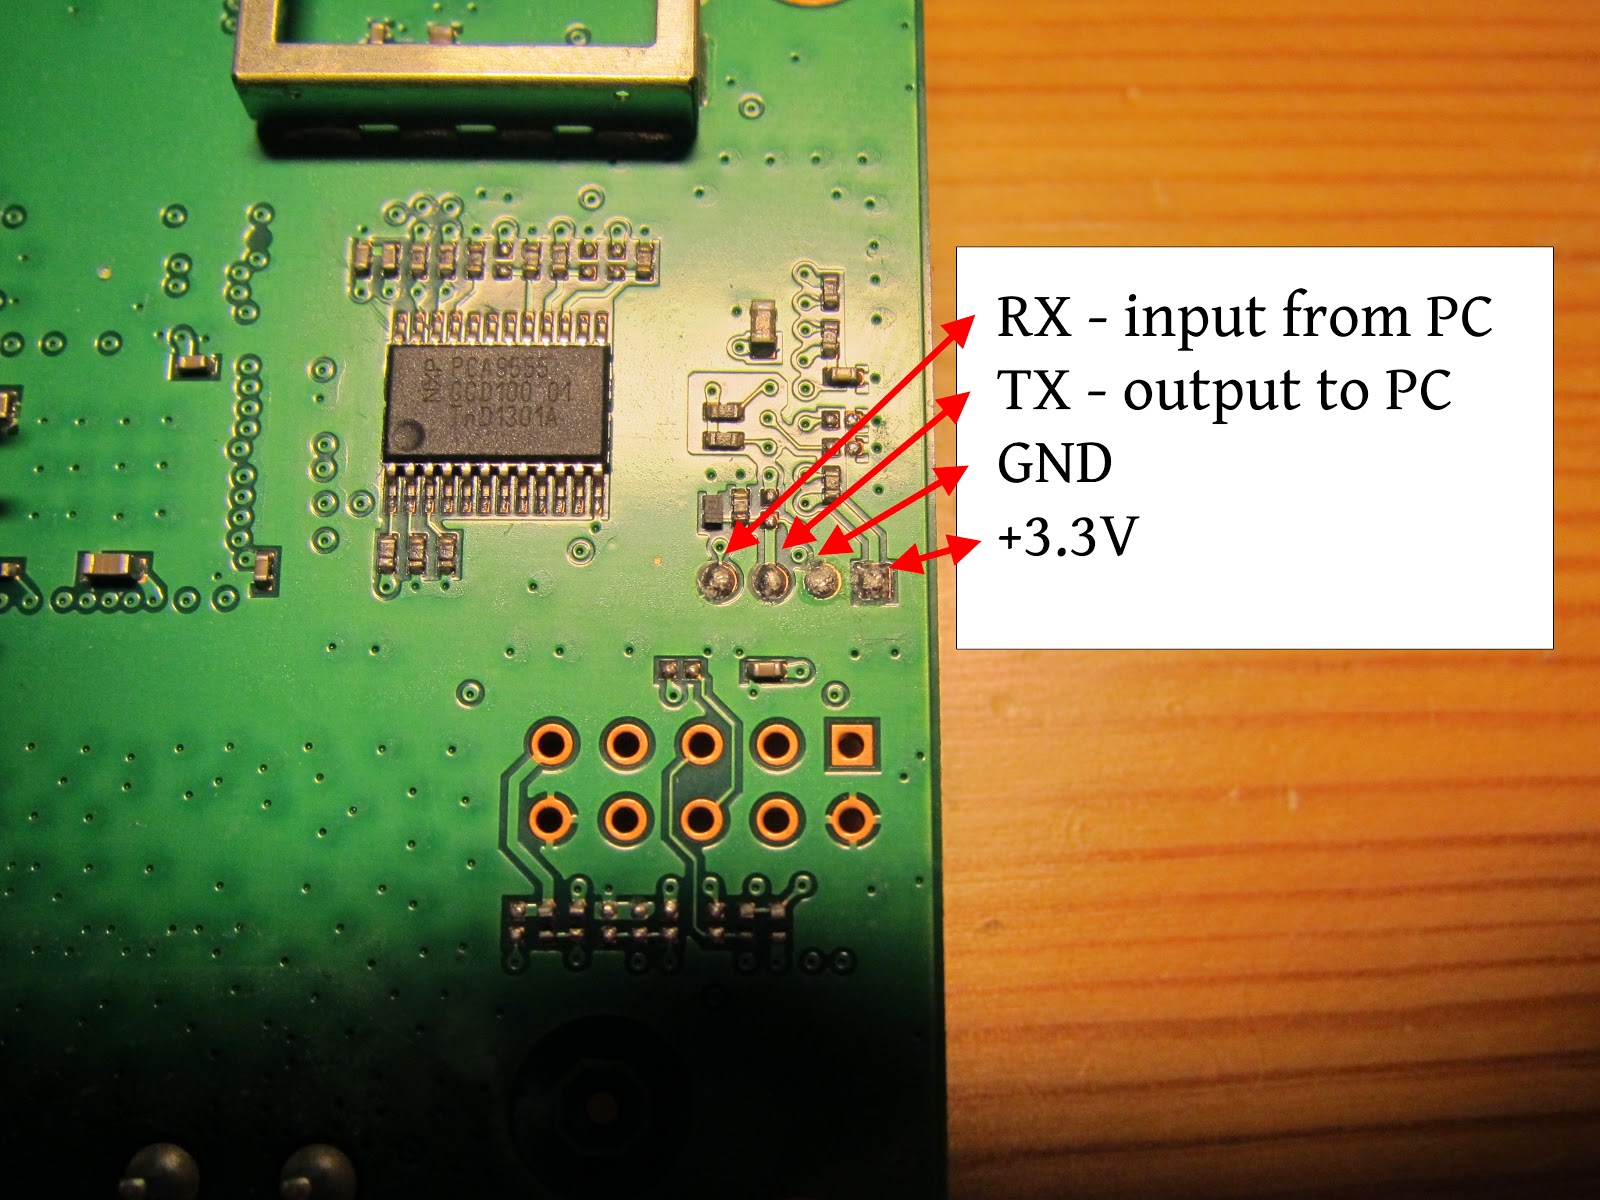
Here's location of Huawei B593u TTL serial console. Settings are usual 115200 8N1.
# Enable boot_wait with 10 second delay for more recovery options
# NAND flash backup
# Enable boot_wait with 10 second delay for more recovery options
If you're using typical USB TTL serial port adapter you only need RX, TX and GND. Make sure your pins are properly labeled as for example my USD 0.99 including shipping CP210x have TX and RX labels reversed.
Tricky part comes after you have known good software and hardware setup done. You will NOT see anything from device when booted because Huawei has disabled console on both CFE bootloader and Linux side. Luckily there's fix for that.
Method 1. This works even if you don't have root shell access to device over SSH. This is also the risky way, use method 2 whenever possible. Because it's inevitable that we got a badass over there reading this better that I document this as well.
DO NOT CONTINUE WITHOUT WORKING SERIAL PORT. YOU WON'T GET BACK TO NORMAL MODE FROM RECOVERY MODE WITHOUT ONE!
Unplug any USB devices if connected. Press and hold down all three buttons on side (WLAN, RESET, WPS). Turn power on. All leds turn on. Keep still pressing all three buttons. Release when all leds except power led turn off.
Within few seconds you'll see typical Linux boot messages scrolling on screen and WPS led starts flashing. If you don't see anything on screen but WPS led flashes then device is in recovery mode (running B593-small.trx) but your serial port wiring or software side is incorrectly setup.
Anyway, now you're in root shell. Next we want to enable serial port also in CFE. Simply type following commands to change NVRAM settings.
# Enable CFE and normal boot (B593.trx) serial console
nvram set console_disable=0
# Enable boot_wait with 10 second delay for more recovery options
nvram set boot_wait=on
nvram set wait_time=10
# Boot regular OS (B593.trx). Use boot_part=1 for recovery OS (B593-small.trx)
nvram set boot_part=0
# Write changes made to NVRAM
nvram commit
Now you can simply power cycle device or reboot from OS. On next boot both CFE and OS serial console is working.
Method 2. This is the way you should use, I've tested this with Polkomtel SP103 firmware so upgrade/downgrade to SP103 in case you run into problems following steps below. I didn't and spent way too much time fixing mess I ended up with method 1. :)
Boot device normally.
Plug in FAT32 or NTFS formatted USB memory stick.
Login to management as admin.
Select USB Management > Server Settings on left hand panel.
Enable FTP server and click submit.
Select USB Management > User Settings.
Create new user by clicking Add Items.
Type ../../../.. in Directory field and enable Read-Write access.
Open FTP connection to device and download /var/sshusers.cfg file.
Your SSH admin password is in plaintext right there: admin:PASSWORD:0. Ignore second "user" line.
Open SSH connection to device, login as "admin" with password from sshusers.cfg
Now you're in "ATP" shell.
Type "shell" to open busybox root shell.
Next we make FULL backup of system so we have something to recover device with if we screw up. There's 16MB SPI flash and 256MB NAND USB flash onboard. We'll take backup of both so make sure your USB memory stick (which should be still plugged in) has as around 300MB free space.
For SPI flash we'll use Huawei "flashtest" binary. Folder where USB memory stick is mounted varies, below it's usb1_1 but yours might be usb2_1. Check this first.
# flashtest info
flash block size : 0x40000 (256k Bytes)
flash block num : 0x40 (64 Blocks)
flash total size : 0x1000000 (16M Bytes)
flash partation info :
---------------------------------------------------------------
Name Address Usage
---------------------------------------------------------------
Boot 0x0---0x40000 Bootloader
Image 0x40000---0xA40000 Main image
Image 0xA40000---0xE00000 Subject image
Curcfg 0xE00000---0xE40000 Curcent config
Faccfg 0xE40000---0xE80000 Factury config
Tmpcfg 0xE80000---0xF00000 Temp config
Fixcfg 0xF00000---0xF40000 Fixed config
Logcfg 0xF40000---0xF80000 Log config
TR069 0xF80000---0xFC0000 TR069 cert
Nvram 0xFC0000---0xFFFFFF Nvram
# Wholeflash
flashtest export 000000 16777216
mv /tmp/flashinfo.bin /mnt/usb1_1/0x000000-0xffffff.wholeflash
# Boot / Bootloader
flashtest export 000000 262144
mv /tmp/flashinfo.bin /mnt/usb1_1/0x000000-0x040000.bootloader
# Image / Main image
flashtest export 040000 10485760
mv /tmp/flashinfo.bin /mnt/usb1_1/0x040000-0xa40000.mainimage
# Image / Subject image
flashtest export a40000 3932160
mv /tmp/flashinfo.bin /mnt/usb1_1/0xa40000-0xe00000.subjectimage
# Curcfg / Curcent config
flashtest export e00000 262144
mv /tmp/flashinfo.bin /mnt/usb1_1/0xe00000-0xe40000.currentconfig
# Faccfg / Factury config
flashtest export e40000 262144
mv /tmp/flashinfo.bin /mnt/usb1_1/0xe40000-0xe80000.factoryconfig
# Tmpcfg / Temp config
flashtest export e80000 524288
mv /tmp/flashinfo.bin /mnt/usb1_1/0xe80000-0xf00000.tempconfig
# Fixcfg / Fixed config
flashtest export f00000 262144
mv /tmp/flashinfo.bin /mnt/usb1_1/0xf00000-0xf40000.fixedconfig
# Logcfg / Log config
flashtest export f40000 262144
mv /tmp/flashinfo.bin /mnt/usb1_1/0xf40000-0xf80000.logconfig
# TR069 / TR069 cert
flashtest export f80000 262144
mv /tmp/flashinfo.bin /mnt/usb1_1/0xf80000-0xfc0000.tr069cert
# Nvram / Nvram
flashtest export fc0000 262144
mv /tmp/flashinfo.bin /mnt/usb1_1/0xfc0000-0xffffff.nvram
Next we use dd to create backup of NAND flash which is simply on-board integrated USB memory stick. Stock OS calls it /dev/nandflash but it's also accessible as /dev/sda0.
# NAND flash backup
dd bs=4k if=/dev/nandflash of=/mnt/usb1_1/nandflash.bin
Now when we have clean state backed up we can continue with NVRAM change that enabled serial console.
# Enable CFE and normal boot (B593.trx) serial console
nvram set console_disable=0
# Enable boot_wait with 10 second delay for more recovery options
nvram set boot_wait=on
nvram set wait_time=10
# Boot regular OS (B593.trx). Use boot_part=1 for recovery OS (B593-small.trx)
nvram set boot_part=0
# Write changes made to NVRAM
nvram commit
And that's it.
P.S. Serial console login is "admin" and password "HW4GCPE". Internally /bin/console aka /bin/cli converts "admin" to "Happy" and "HW4GCPE" to "tonight" then performing strncmp. WTF?
P.S. Serial console login is "admin" and password "HW4GCPE". Internally /bin/console aka /bin/cli converts "admin" to "Happy" and "HW4GCPE" to "tonight" then performing strncmp. WTF?
I have B593u-91 I update B593u-12 firmware now modem stuck in recovery mode
ReplyDeletehow to repair it